We are a very crafty house...but sometimes finding ideas to get the juices flowing is a little tricky. That's why I love favecrafts.com. Here are a few of the Summertime crafts from their site that I hope to do with my kids this summer. Maybe one will get your creative juices flowing too. ARE YOU CRAFTY...DO YOU HAVE A GO TO SITE PLEASE SHARE!
=^D

Instructions:
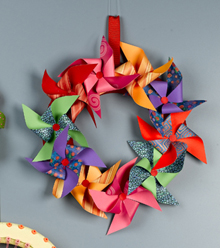
- Paint a foam wreath complementary color to the paper you've picked let dry.
- Cut ten 5" squares from double-sided paper. If using single-sided papers, paste two sheets together back to back before cutting squares; let dry.
- To create pinwheels- Use pencil to mark 2-1/2" lines from corners of paper squares toward centers. Use craft knife and metal-edged ruler, or other cutting tool, to cut paper squares along these lines; do not cut all the way to center. Bring left corner of each side down to center and secure with glue gun.
- Punch ten 1/2" circles from solid colored paper and glue to centers of pinwheels. If you want to give them a little glitz and sparkle you can use paper brads. Glue pinwheels side by side to wreath.
- Glue ribbon ends together to create hanging loop; glue ends to top center back of wreath.
~~~~~~~~~~~~~~~~~~~~~~~~~~~~~~~~~~~~~~~~~~~~~~~~~~~~~~

Instructions:
- Wash and dry tote according to manufacturer’s instructions. DO NOT USE FABRIC SOFTENER. Iron flat as needed.
- Cover cardboard with wax paper and insert into tote. Tape sides and top as needed to insure fabric is taut.
- On paper plate mix a separate puddle of each paint color with Textile Medium following package instructions.
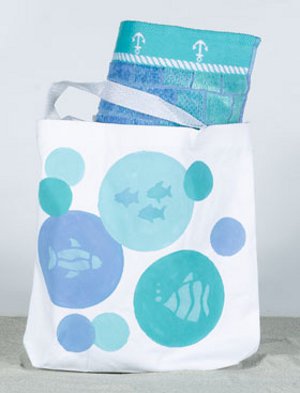
- Using the photo as a guide place a medium circle stencil on the tote and secure in place with tape.
- Dip the stencil brush into the desired color of paint, tap excess off on plate. Start painting in the center of the circle and work the color towards the edges to prevent the paint from seeping under the edge. Let dry and paint two more circles in different colors as shown. Wipe the excess paint out of the brush but do not get it wet. If the bristles are wet it will thin the paint and cause it to seep on the fabric.
- Switch to a small circle and continue painting as desired. Let dry.
- Use the fish stencil to add in the the centers of the larger circles using the desired color from the palette.
- Remove tape and cardboard. Press the painted area, on the reverse side to set the paint.
- Paint will take one week to cure. You may use the tote once the paint is dry to the touch but do not wash it for at least one week.
~~~~~~~~~~~~~~~~~~~~~~~~~~~~~~~~~~~~~~~~~~~~~~~~~~~~~
Instructions:
- Transfer roof pattern to cardboard and cut out roof. Spray-paint both sides of roof and bottle cap black. Let dry. Spray paint bottle brown. Let dry. Working with 1 paint color at a time, dip dampened sponge into burnt umber and black and sponge-paint the bottle. Let dry. With craft knife, cut 1 (1-3/4” diameter) circle about 3” up from bottom of bottle for door. Punch 1 hole about ¼” below door.
- Measure approximately 1-1/4” to left and right of door and transfer window pattern onto bottle. Paint design beige. Paint outline details in black paint using liner brush on each window. Paint beige wavy line around door. Let dry. Push dowel halfway into hole below door and glue to secure. Let dry.
- Center and drill 1 (1/8” diameter) hole in bottle cap. Fold cord in half to form loop. Working from outside of bottle cap, thread cord ends through hole in cap. Knot cord ends. Pull knot up to cap and glue knot to cap. Let dry. Screw cap onto bottle.
- Curve roof into cone shape, overlapping straight edges and glue. Hold edges in place with clothespins until glue is dry. Snip off tip of roof to leave hole for hanger. To help weatherproof the roof, brush with coat of OK to Wash-It glue on each side of roof. Let dry. Glue pine bark pieces to cover outside of roof (with Tacky glue). Let dry.
- For sign, cut 1 (2-1/2”) length and 1 (1-3/4”) length from craft stick. With shorter piece centered along longer piece, glue craft stick lengths side by side. Drill 1 (1/6” diameter) hole in each end of longer piece of sign at top edge.
- Write “Welcome Home” on sign with marker. Cut 1 (5”) length of wire. Wrap center of wire around bamboo skewer to coil. Remove skewer. Insert 1 end of wire through each hole at top of sign, working from back to front. Bend up ends. Cut 1 (1-1/2”) length of wire. Bend wire in half to form hanger. Slip bent wire hanger onto coiled wire on sign. Working from outside, poke hanger wire ends through bottle about 1-3/4” above door. Bend wire ends to inside of bottle to secure hanger. Thread braided cord hanger through hole in roof, working from inside roof.
.jpg)

These crafts are so cute. We love to craft in our house as well so thank you for the new website to check out
ReplyDeleteI've never heard of favecrafts, but we do a lot of crafting here! Thanks for the ideas :)
ReplyDeleteThat pinwheel is so cute...thanks for the post. I am always looking for ways to keep my kids busy
ReplyDeleteI love the pinwheel wreath also. Anything with paper, toilet paper tubes, duct tape, spray paint or PVC pipe is the perfect project for us.
ReplyDeleteI love crafting. Will try this!
ReplyDelete